Talos Linux is an OS built to run Kubernetes clusters. There is no SSH, everything is controlled via an API. My homelab runs Xen Orchestra, looking at the instructions there is no guide for Xen Orchestra, so being someone who loves a challenge, I thought it would be good to try and set this up and see how we get on.
Step 1 is to download the ISO. I’m on AMD so I grabbed the metal-amd64.iso from the releases page. The next step is to upload the ISO to my Xen Orchestra ISO repository. For details on how to create an ISO repository if you don’t have one check out this article.
With the ISO setup, the first step is to create a new VM to be our control plane node. For this cluster I’m only going to have a single control plane node to keep things simple. Click on new VM, then fill out as per the screenshot below:
The key parts to call out here is you want to use a template that is compatible that allows you to set an ISO such as Ubuntu Focal Fossa 20.04. I set the machine name to Talos Control Plane, vCPUs and RAM will be dependent on what you have available.
Once the machine boots, go to the console in Xen Orchestra and read the IP address from the screen. The thing that caught me out when I was researching for this blog post, was that every time the machine restarts it changes its IP address. Given that in our setup we are going to use a static IP for our control plane node, this is not going to work for us.
To solve this problem go to the console of the Talos Control Plane VM in Xen Orchestra and press F3 to get to the network settings. Press tab until you get to the interface, change it to the one with a name starting enx followed by some random characters. Set mode to Static, DHCP means it will change each reboot. Set the addresses field to the IP address you read from the main screen and then the CIDR for your network, so for me I’m using a 192.168.1.0/24 network and the IP the machine got given was 192.168.1.44, so I set the addresses field to 192.168.1.44/24. Then set the gateway to the IP address of your gateway, for me that’s 192.168.1.1. Save the configuration.
To configure talos you can use the command line tool talosctl, to install:
curl -sL https://talos.dev/install | sh
Once installed set CONTROL_PLANE_IP on your command line to the IP address of this VM and then run:
talosctl gen config talos-cluster https://$CONTROL_PLANE_IP:6443 --output-dir _out
This will generate a set of config files in the directory _out/. The disks by default will be incorrect in these template files for use with Xen Orchestra. Find out the disk paths of your machine by running:
Replace the disk property inside the controlplane.yaml and worker.yaml with your disk path, for me its /dev/xvda and then save the files. Your yaml in those files should look like:
    install:
        disk: /dev/xvda # The disk used for installations.
With that in place you are now ready to bring up the control plane node. To do that run the following command:
Once you run this command, the control plane VM will stop. Go to Xen Orchestra and start it again, then if you watch the console you should see it start. Once its up you are ready to bootstrap the cluster, which will start etcd and get Kubernetes actually running.
To use the cluster its easier to setup the talos config using these comamnds:
Once you have run the bootstrap command, if you view the console of the control plane VM in the Xen Orchestra, you can slowly watch all of the health checks go green. When that happens the cluster is up and cooking:
Now you can use the cluster from the command line, to retrieve the kubeconfig run:
talosctl kubeconfig .
Which will copy the kubeconfig locally, you can run a test to see if you can query your new cluster with kubectl using:
kubectl get nodes --kubeconfig=./kubeconfig
That should return your lone control plane node. In order to add some worker nodes, follow the steps above for adding another VM, don’t forget to set the IP address to be static. Then with the new VM ready run the following command to make it a worker in your cluster:
After you run this command the VM will stop, so you need to start it in Xen Orchestra. Once its started you should see it spin up and join the cluster.
For my cluster I added another worker node and everything is working perfectly.
I’m super impressed with my first impressions of Talos OS. Does a lot of heavy lifting to setup Kubernetes clusters for you. It is simple to use and I got the whole cluster setup in around 15 minutes from zero, which for anyone who has every provisioned clusters using kubectl is pretty good going.
Anyone looking for a good way to provision and run Kubernetes clusters on bare metal, definitely check out Talos OS.
I have written quite a few blog posts on how to set up a home Kubernetes cluster. To operate the cluster you need to have network access to Kubernetes API endpoint (hosted by the kube-apiserver). This is the endpoint that the kubectl command line tool talks to make API requests to the cluster. Due to the fact my home cluster is just on my home network, I wanted a way to be able to access the cluster from anywhere in the world.
I wanted to avoid the obvious solution to this problem of opening up a port on my router and setting up port forwarding to the cluster. This is not a nice approach from a security standpoint as you are opening up a port to the internet.
Then I remembered a Hanselminutes podcast I had listened to about a technology called Tailscale (I would highly recommend checking out the podcast which has the founder of Tailscale Avery Pennarun on it). Tailscale is a really cool VPN technology that solves a lot of the common pain points with a VPN and fits the distributed world we now live.
At a high-level Tailscale puts all of your devices that join your network on a private IP address and then uses very clever NAT traversal and firewall punch through techniques (see this excellent blog post for the details) to enable secure point to point connections between any two devices.
Tailscale is an awesome solution to our problem as it will enable us to connect to our cluster on a private secure connection from anywhere in the world, without the need for any port forwarding. To make our cluster work with Tailscale we simply have to follow these steps:
Sign up for a free Tailscale account(NB its free for 20 machines, I’ve got no affiliation with Tailscale)
Install Tailscale on each control plane node and connect (tailscale up)
Install Tailscale on the client machine you want to use to connect to Kubernetes and connect to Tailscale
Get the Tailscale IP of your control plane node. To do this you can either log into the Tailscale UI and find the IP or you can SSH onto the control plane node and run tailscale ip
Replace the IP address of the control plane node in your kube config file with the Tailscale IP address
We are now almost there we can actually connect to our control plane now. But unfortunately we are not quite done as if you run kubectl get nodes now you will get a TLS error. This is because the Tailscale IP is not one of the IPs in the kubeapi-server certificate. We could pass the allow untrusted flag to kubectl and it would work but this isn’t great.
To fix the TLS error we simply need to add the Tailscale IP to our Kubernetes API certificate, this excellent blog posts explains how to do it so I’m not going to rehash the information here. Once the new certificate is in place you should be good to rock, verify by running kubectl get nodes and check you get a response and no TLS error
For an extra check, disconnect from your home network and connect to a different network (I tethered to my phone) and run kubectl get nodes again. It should work! Which is actually amazing when you think about it as Tailscale has just punched through the networks from your client machine tethered to your phone all the way to your Kubernetes API.
With Tailscale in place, you are now able to operate your Kubernetes cluster from anywhere in the world without exposing any ports on your home network!
I have blogged about how I set up a bare-metal Kubernetes cluster on VMWare. In this post I’m going to explain how to run a HA Vault cluster on the cluster.
Vault is a cloud native secrets engine that can protect your secrets and allow applications to retrieve them giving you a central place to store secrets. This video by Armon Dadger Hashicorp CTO gives a really good oversight Vault.
To run a HA Vault cluster in Kubernetes requires quite a few steps so I wanted to document how to approach it. Disclaimer this is by far from a guide on how to deploy a production grade vault cluster. It is aimed at giving you a way to deploy a HA cluster as starting point or if you are link me and want to deploy a Vault cluster on your home Kubernetes cluster for fun!
Step 1- Create Vault Namespace
The official vault helm chart which we are going to use to install Vault sets up Vault in a vault namespace. In order to get our cluster ready we need to create the vault namespace using the following command:
kubectl create namespace vault
Step 2 – Generate Certificates
In order to run a Vault cluster you use a TLS certificate for vault to use in order for it to expose its https endpoints. There are a few approaches we can take but the easiest is to generate our own root CA and then use that root CA to sign a certificate. We can then add the root CA to the trust store of the machine we want to use to access the cluster so that it will trust the vault endpoints.
To generate the root CA first we need to create a new private key:
openssl genrsa -out rootCAKey.pem 4096
Create the certificate signing request with this key:
Note I’m using an expiry of around 30 years for the root CA.
If you are doing this for real then you would probably want to look at setting up an intermediary but as this is just for fun we are going to sign the server certificate directly with the root CA. Lets generate a private key for the server:
openssl genrsa -out vault.key.pem 4096
For the vault server certificate, we will want to configure a few subject alternative names in order for everything to work correctly. Firstly, we can come up with a domain that we will later alias to point to our vault cluster, I’m going to use vault.local for that. Next, we need to create subject n subject alternative names in the format of vault-X.vault-internal where n is the number of vault nodes we want to run and x is the node number. For example, if we run 3 nodes then we would need to create a certificate with the 3 addresses vault-0.vault-internal, vault-1.vault-internal and vault-2.vault-internal. These internal endpoints are used by the vault nodes to talk to one another.
In order to create the subject alternative names we need to create a config file like the one below:
[req] req_extensions = v3_req distinguished_name = dn prompt = no
We have now created our two certificates one for the root CA and one for the vault server itself.
Step 3 – Upload Certificates
In order for Vault to be able to use the certificates, we have generated we need to load them into the cluster as kubernetes secrets. We need to only upload the certificate for the root CA so that we can set Vault to trust any certificate that is signed by this root. This is needed so that the Vault instances trust each other and can talk over TLS to each other.
To upload the root CA cert we can use an opaque secret:
For the server certificate we need to upload both the certificate and the private key in order for our Vault container to use that certificate to host its TLS endpoint. To do this we can use the command:
This command will upload the server certificate using the Kubernetes inbuilt tls secret type which will create a secret with the key and certificate as data under tls.crt and tls.key.
Step 4 – Set up Local Storage Volumes
In order to run a Vault cluster we need to choose a storage backend. The solution with the least moving parts is to configure vault to use an inbuilt raft storage backend. To make this work we have to create persistent volumes for each vault container to use. To solve this we are going to create a persistent volume on disk on each node, we can use node affinity to pin the volume so that it is always on the same node.
To set this up we first have to configure local storage by creating the local storage class:
With the file above created, we can create the storage class using the kubectl apply -f storageclass.yaml command.
Next, we have to create the volumes themselves. I have 3 worker nodes in my cluster and am going to run a 3 node vault cluster so I am going to create 3 persistent volumes by using the code:
In the above code you will need to change the worker01 to the name of your worker node. This is the line that makes the volume only available on that node. You will have to copy and paste this file for as many nodes as you are going to run, altering the name and the node affinity clause each time. Then use the kubectl apply -f <filename> to create the volumes on the cluster.
Before the volumes will work you have to make sure the path you set physically exists on disk, so be sure to create that on each of your worker nodes.
Step 5 – Install Vault
With all of the above in place we are finally ready to install Vault! We are going to use helm to install Vault, so the first thing we need to do is add the hashicorp repo to helm:
This file contains hidden or bidirectional Unicode text that may be interpreted or compiled differently than what appears below. To review, open the file in an editor that reveals hidden Unicode characters.
Learn more about bidirectional Unicode characters
This values.yaml configures 3 vault nodes and mounts the certificates using the secrets we created earlier. I have tuned down the memory requirements of each node as the VMs I’m running are pretty small.
With all of this in place we can get Vault installed:
Once vault is installed we can check its running by listing the pods:
kubectl get pods -n vault
This should print out the 3 vault pods vault-0, vault-1 and vault-2. To get the cluster up and running we need to initialise one of the vaults and then save the unseal keys and root token and add those to the other vaults.
To initialise one of the vaults first open a terminal on the container using:
Now we need to turn off TLS verification as we are accessing vault on localhost, do this by setting up VAULT_SKIP_VERIFY environment variable:
export VAULT_SKIP_VERIFY=1
Now we can initialise vault using:
vault operator init
Make sure you save the unseal keys and root token somewhere safe and then unseal this vault by running vault operator unseal 3 times and providing 3 of the unseal keys. Then ssh onto the other two vault containers using the kubectl exec command given above but changing the pod name to vault-1 and vault-2, export the VAULT_SKIP_VERIFY variable and then run vault operator unseal 3 times to unseal both of the other vaults.
Step 6 – Configuring Your Machine To Use Vault
To finish our setup we need to configure our machine to be able to trust our new Vault cluster. To do that first load your root CA certificate into your machine’s trust store. How to do this will vary based on which operating system you are on. For Mac you can follow these instructions.
I have Metal LB setup as a load balancer on my cluster as explained in this post. Metal LB creates a virtual IP address that will load balance across the cluster and route to vault. I have added an entry to my /etc/hosts file with vault.local pointing at the virtual IP address for the Metal LB IP that points to vault.
Next, install vault on your machine, instructions to do this can be found on the vault install page. With all of that configured we can set the vault address for the cli to use by running:
export VAULT_ADDR=https://vault.local:8200
Now we can successfully use our new vault HA cluster, test it out by running vault status you should see the status of the cluster.
In the last two posts (part 1 and part 2), I covered how I turned my desktop machine into a hypervisor using EXSI to serve 6 VMs for a Kubernetes cluster. In this post we are going to cover how to setup the unifi controller software on the cluster.
I run Unifi (Ubiquiti) networking kit throughout my house. It is industrial grade networking equipment. To run the equipment you have to run the unifi controller software. The controller software gives you a UI that you use to configure your switches, access points etc. Ubiquiti sell a Cloud Key that runs the software but ~£130 feels like a lot of money to me for something just to run a configuration UI. I used to run the controller software in docker on my [https://global.download.synology.com/download/Document/Hardware/DataSheet/DiskStation/13-year/DS713+/enu/Synology_DS713_Plus_Data_Sheet_enu.pdf](Synology Diskstation 713+) but since I have started using the Synology to run my home CCTV setup, the 8 year old hardware was really struggling to run both the Video Surveillance and Unifi Controller software. So I thought it would be great to move the Unifi Controller over to my newly created Kubernetes cluster.
To make this work we are going to have to solve 2 problems:
We are going to have to setup persistance in our cluster as the Unifi Controller software saves the network config and that needs to be there when the pod restarts
We need a way to expose the controller software to our network on a static IP – just using one of the node IPs is not great as if that node goes down then all of our network kit can no longer talk to the controller, what we want is a virtual IP that points to a node that is running in our cluster
With the preamble out of the way lets get into solving problem one. How are we going to setup persistance in our Kubernetes cluster. To do this we need to setup a persistent volume, we can then claim this volume and attach it to a pod. For the persistant volume I thought the easist thing to do was to setup an NFS server. That way pod could launch on any node and simply attatch to the NFS server to mount the volume.
To create the NFS server, I simply made another clone of a VM (as covered in part 1). Once cloned, I changed the IP to the next available sequential IP 192.168.1.206. To setup the NFS share I ran the following commands:
This installs the NFS server onto Ubuntu and sets up a folder for the share (/var/nfs). I set the permissions on this share wide open so that anyone can write to this share, which is good enough for a home cluster.
The last part is to expose this share out by editing the file /etc/exports and adding the following line to allow any machine on my network to read or write to the share:
To make those changes take effect we need to restart the NFS server with sudo systemctl restart nfs-kernel-server.
With that in place we need to setup the persistant volume. A persistent volume is a way for you as the administrator of the cluster to make a space available for people using the cluster to mount on their pods. To setup the NFS share we just created as a peristent volume we can use the following yaml and applying with kubectl apply -f volume.yaml:
This is making 20GB available for people to use on the share (/var/nfs) that we just setup on our NFS server (192.168.1.206). To use the persistent volume with the unifi software we need to claim it. To claim it we create a persistent volume claim with the following yaml and applying with kubectl apply -f claim.yaml:
We can check that the persistent volume has a bound claim by:
kubectl get persistentvolumes
NAME   CAPACITY   ACCESS MODES   RECLAIM POLICY   STATUS   CLAIM                     STORAGECLASS   REASON   AGE
nas    20Gi       RWO            Recycle          Bound    kube-system/unifi-claim   slow                    23h
We can see that the persistent volume’s status is Bound and the claim is unifi-claim which was the claim we just created.
To setup the unifi controller software, I following the instructions on this helm chart. To begin we need to add the helm repo:
Before we install the chart we need to create a custom values.yaml in order to pass our persistent volume claim in for the unifi controller pod to use:
With that in place we can install unifi using helm install unifi k8s-at-home/unifi -f values.yaml. Once installed I checked the status of the unifi pod and noticed that it wasn’t started. The error from the pod was bad option; for several filesystems (e.g. nfs, cifs) you might need a /sbin/mount. helper program., which I realised is because we haven’t setup the NFS client on our worker nodes. This is quite straight forward to fix by logging onto each of the worker nodes and running:
sudo apt update
sudo apt install nfs-common
With this run on every node our pod now starts. But we have another issue, I checked the NFS share and no files were being written. From running the unifi software on docker on my Synology I knew that you needed to mount a volume to /var/lib/unifi on the container. From checking the pod definition I could see the volume mount was missing. I could not see a way to provide it on the chart. As an aside this is one of the things I dislike about Kubernetes. It can feel like death by configuration some of the time! Anyway I got the unifi deployment into a yaml file using kubectl get deployment unifi -o yaml > unifi.yaml and then added another volume to it:
With the extra volume in place at the /var/lib/unifi path I applied the deployment to my cluster and volia, files started appearing in the NFS share. Internally the unifi controller uses a Mongo database for state and it puts those files in the share.
The second problem to solve is how to make the controller available on a static virtual IP. We want to do this for two reasons. Firstly, if we pick a random node’s IP and use that for our controller then if that node goes down for any reason our controller will be offline. Secondly, if we use a service of type NodePort then this provides is with high port numbers in the range 30000-32767, there is no (easy) way to use the real port numbers of the controller. This is important as the unifi network equipment talks to the controller on a set of predefined ports and there is no way we can change that.
To solve our problem enter Metal LB. Metal LB is an awesome piece of software that allows you to setup a Kubernetes load balancer and point it at a virtual IP. Metal LB takes care of broadcasting this virtual IP and routing it to an active node on your cluster. If a node goes down then no problem, as Metal LB will repoint the virtual IP at a different node. This nicely solves both of our problems above.
Above I’m making the IP address 192.168.1.61. I’m doing that because that was the IP my old unifi controller was on so it enables me just to swap the controller out.
To make unifi use this IP we just have to change the deployment to make it use a Kubernetes load balancer by updating our values.yaml file to:
Then we can apply using helm helm upgrade --install unifi k8s-at-home/unifi -f unifi.yaml. Once we have done that we can see that the unifi service is now being exposed on external IP 192.168.1.61 by using kubectl get service unifi:
NAME    TYPE           CLUSTER-IP       EXTERNAL-IP                                                                                  AGE
unifi   LoadBalancer   10.106.167.144   192.168.1.61
By using a load balancer it will expose all of the container ports on 192.168.1.61, we can verify by hitting the UI on https://192.168.1.61:8443. It works! To complete the setup, I backed up my old unifi controller and then restored it.
All of the open source software that makes the above possible is so awesome. Seriously impressed with Metal LB, how easy it was to setup and how cool it is. I now have a very highly available unifi controller, running in kubernetes and it performs like a dream!
In part 1 we setup 6 Ubuntu Server VMs (using VMware ESXI) all available on the host network. In this part we are going to take those 6 VMs and install Kubernetes with Cilium CNI. Our Kubernetes setup will have 3 master nodes (control plane) and 3 worker nodes, making it a highly available cluster. The astute reader will point out that all of the VMs are running on a single host so making this cluster HA is kind of pointless. Yes to a point I would agree with you, but making the cluster HA is better for two reasons, firstly, it will enable zero downtime upgrades to the control plane and secondly it gives us experience in making a HA cluster which for a production use cases we would want to do.
To setup Kubernetes I have decided to go with kubeadm. I know this is cheating a tiny bit versus installing all of the components ourselves, but even though kubeadm does a bit of heavy lifting for us, we will still need to understand a bit about what is going on to get the cluster working.
The instructions I’m going to be following can be found on the kubeadm site. I’m going to talk through the salient points here as I had to add a few workarounds to get the cluster running. First step is to install kubeadm on every node (it would’ve been better to have included this in our first VM that we cloned as it would’ve saved some time but you live and learn). To install kubeadm:
The above command sets the control-plane endpoint as is recommended by kubeadm if you want to setup a HA cluster. For now skycluster is just a hosts entry that points to master01‘s IP. I have added this entry to every machine in our setup. We are setting the skip-phase kube-proxy flag because I am planning on using Cilium as a CNI. Cilium uses eBPF to super power your cluster and provides the kube-proxy functionality by using eBPF instead of iptables. I recently interviewed Dan Wendlandt the CEO of Isovalent who are the company behind Cilium in the Form3 .tech podcast, an episode well worth listening to!
I got a warning saying that swap in enabled and kubeadm should be run with swap off. To turn off swap run sudo swapoff -a. To make sure that swap stays off even after a reboot we need to edit /etc/fstab and comment out the following line /swap.img none swap sw 0 0 by adding a # to the start of it. After turning off swap, I ran the the kubeadm init command again.
This time command timed out. From the error message it states that the kubelet cannot be contacted. The kubelet is a service that runs on each node in our cluster. Running the command systemctl status kubelet reveals that the kubelet service is not running. For more information as to why the service isn’t running I ran journalctl -u kubelet, then press Shift+g to get to the bottom of the logs, then right arrow to see the full error message which was Failed to run kubelet" err="failed to run Kubelet: misconfiguration: kubelet cgroup driver: \"systemd\ is different from docker cgroup driver: \"cgroupfs\"". To fix this we have to switch either kubelet or docker to use the same cgroup driver. From doing some reading it is recommended to use systemd as the cgroup driver so I updated docker to use systemd by running:
With that change in place lets run kube init... again. This time we get: Your Kubernetes control-plane has initialized successfully!
Wahoo!
To be able to contact the cluster from our machine we need to add the cluster config to our local kube config file. To do this we can copy the file /etc/kubernetes/admin.conf from the master01 node onto our machine. From there we can grab the entry for the new cluster and put it into our kube config file located in $HOME/.kube/config. Once we have done that if we get nodes by running kubectl get nodes we see
NAME STATUS ROLES AGE VERSION
master01 NotReady control-plane,master 13m v1.22.0
The node is not ready! To find out why we can describe the node using kubectl describe node and then if we look in events, we see the error container runtime network not ready: NetworkReady=false reason:NetworkPluginNotReady message:docker: network plugin is not ready: cni config uninitialized. When you install a new kubernetes cluster it does not come with a CNI. The container CNI is responsible for handling the IP addresses for pods that get created (amongst other things). As stated earlier we are going to use Cilium as our CNI of choice so we can super power our cluster.
To install cilium we can use the following command
Which I got from the cilium documentation on how to install cilium without kube proxy. I got the port of kube api server by describing the kube-api server pod using describe pod kube-apiserver-master01.
Now that cilium is installed when we check the status of the nodes again we now see:
NAME STATUS ROLES AGE VERSION
master01 Ready control-plane,master 15m v1.22.0
Awesome! The first control plane node is now fully working!
Lets not rest on our laurels, the next job is to setup the two other control plane nodes nodes. This would’ve been made easier if i would’ve had the forsight to pass --upload-certs flag to the initial kubeadm init command. This flag stores the control plane certificates inside a kubernetes secret, meaning the joining control plane nodes can simply download them. Unfortunately, I did not do that so I had to copy the certificates manually. Luckily this helper script is available on the kubeadm documentation:
USER=kevin # customizable
CONTROL_PLANE_IPS="master02 master03"
for host in ${CONTROL_PLANE_IPS}; do
  scp /etc/kubernetes/pki/ca.crt "${USER}"@$host:
  scp /etc/kubernetes/pki/ca.key "${USER}"@$host:
  scp /etc/kubernetes/pki/sa.key "${USER}"@$host:
  scp /etc/kubernetes/pki/sa.pub "${USER}"@$host:
  scp /etc/kubernetes/pki/front-proxy-ca.crt "${USER}"@$host:
  scp /etc/kubernetes/pki/front-proxy-ca.key "${USER}"@$host:
  scp /etc/kubernetes/pki/etcd/ca.crt "${USER}"@$host:etcd-ca.crt
  # Quote this line if you are using external etcd
  scp /etc/kubernetes/pki/etcd/ca.key "${USER}"@$host:etcd-ca.key
done
This script copies all of the certificates we need onto each of our control plane nodes (master02 and master03). Once run, we have to go on to each node and copy all of the certs to /etc/kubernetes/pki (this folder won’t exist so we need to create it). Then we need to copy the etcd-ca.key and etcd-ca.crt to /etc/kubernetes/pki/etcd/ca.key and /etc/kubernetes/pki/etcd/ca.crt respectively. Once those changes are in place I had to change docker to use systemd and turn off swap on each node by (the steps we saw earlier):
sudo -i
swapoff -a
systemctl restart docker
systemctl daemon-reload
With those changes in place we can now run the kubeadm join command that we got given when we successfully ran kubeadm init:
These commands automate the switching of docker on each of the worker nodes to use systemd, then we use kubeadm to join the node to the cluster. With this command run on each worker node we now have a fully working cluster, which we can verify with kubectl get nodes:
NAME STATUS ROLES AGE VERSION
master01 Ready control-plane,master 24h v1.22.0
master02 Ready control-plane,master 16m v1.22.0
master03 Ready control-plane,master 32m v1.22.0
worker01 Ready 4m12s v1.22.0
worker02 Ready 2m8s v1.22.0
worker03 Ready 101s v1.22.0
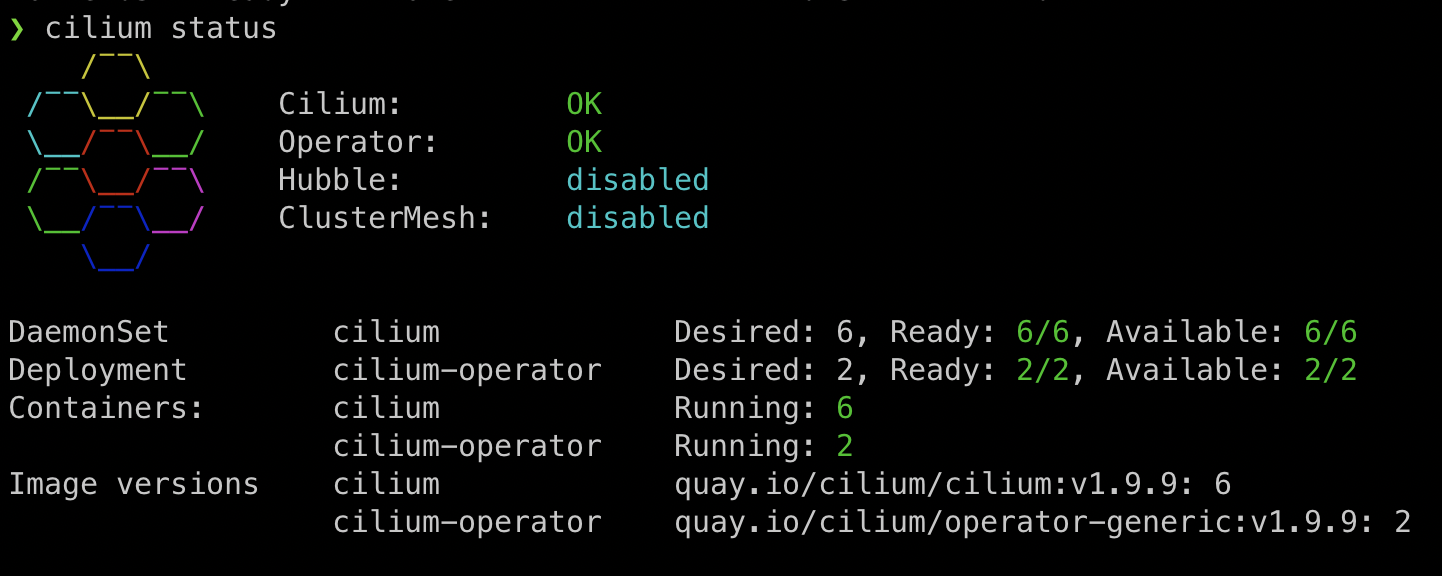
Lets check the health of cilium using the awesome cilium cli. To install, simply download the release for your OS and copy the binary to your path. With that in place we can run cilium status which gives us the following output:
We can see that cilium is healthy and we have 6/6 cilium containers running (one on each node). We now have a fully working Kubernetes cluster ready for action.
I decided to recommission decent spec desktop (16 core – Threadripper 1950x, 32GB RAM) into a server of VMs. With the first project to be to build out a HA Kubernetes cluster. Why? When you can get a Kubernetes cluster in a click from a cloud vendor? For fun and to learn! This blog series will take you through the journey of building out the cluster.
To start on the project I decided to use VMware’s ESXI to host the VMs. For those who don’t know ESXI is an OS that only exists to allow you to serve VMs. If you want the full blown product it is very expensive but luckily you can get it for FREE from VMware, simply by registering for a free license and added once installed. There are a couple of limitations on the free license but none that will get in the way of most hobbiests. The limitations are you can only have 2 real CPUs in your VMs and as most people are going to put this on a single machine that won’t matter and the way backups are of the whole fleet of VMs is restricted, again this is not a concern for me. So for free this is a pretty good deal.
To install, I simply downloaded the x86 64bit ISO and put it on a USB drive using BalenaEtcher. Then simply boot from the USB drive and hit next a few times through the ESXI install. Once installed a web url is displayed showing the IP address of the machine, that is how you interact with ESXI. The UI is a bit 1990s but remember we are talking about a free license here!
For the cluster VMs I decided to use Ubuntu 20.04 LTS server edition. For my use case I don’t need the added bloat that comes with desktop Ubuntu. I created a new VM and attached the Ubuntu ISO and ran through the installer. What is very cool is the default way ESXI sets up the VMs is that it makes them available on the main network. So for example in my home network I’m using 192.168.1.1/24 and the VMs get an IP address in that CIDR. That means that from another machine when you SSH into the VM you don’t even know that its a VM, you can treat it like any other machine on the network. ESXI setups up a virtual switch on routes traffic through the host machine to the VM automatically.
I named my first machine master01 as for my HA Kubernetes cluster I’m going to build out 3 master nodes to run the control plane and 3 worker nodes. Once the first machine is up and running there is a really easy way to create the other 5. Simply shutdown the VM and then clone it, this Youtube video explains how to clone a VM so I’m not going to repeat the instructions here.
Once all 6 machines have been created, there are a few things we need to do to tidy them up. Firstly, I wanted them all to have sequential IPs in my network so I would remember where they were. To do this we simply need to edit the file /etc/netplan/00-installer-config.yaml to something like the following:
In the above configuration we are setting the static IP of the machine to 192.168.1.202 with a default gateway of 192.168.1.1 to make this config apply run sudo netplan apply. The next thing we need to do is rename the machines, as currently they all have the same hostname as the copied VM. To do this first we update the hostname in /etc/hostname and then update any reference to the old machine name in /etc/hosts to the new one. With those changes in place we need to reboot to make them apply.
Lastly to make the machines easier to work with, I setup the /etc/hosts file on my laptop to the following:
A while ago I produced a Terraform course for INE. I really enjoyed the experience but there were a few things that left me frustrated. Such as the course was quite expensive (I couldn’t set the price) which set a high barrier to entry for most people. It was also quite hard to update the course due to the way the course was structured a small change would have been quite a lot of rework.
With the release of Terraform 0.12 where Hashicorp made a number of breaking changes, I wanted to release more content to help people get started with Terraform and learn why they should use it. I started to research into writing my own book and that’s when I found Leanpub.com. Leanpub is an amazing site where you can self publish your own book from markdown. It allows you to automate the flow of publishing a book from GitHub (great for developers) and the best part is that it allows you to release a book before it is finished and start getting feedback. Then as you write more and more of the book you can keep releasing new versions. The model is kind of like beta software. You can get feedback from your readers early and then take that feedback into the book to fix typos, improve chapters and even shape upcoming content.
My book Terraform: From Beginner to Master has been in the works for a couple of months. Available now on leanpub. You can choose to pay what you want (down to a minimum) for the book plus you are protected by leanpub’s refund policy. Where leanpub will give you your money back with no arguments within the first 45 days. This means you can try books out on Leanpub virtually risk-free. You can also download them into a format compatible with your favorite eReader.
The book takes you from not even knowing what Terraform is, to explaining the business case as to why you should use it, all the way through from giving you a solid understanding of how complex Terraform projects work using AWS for real-world examples. If you purchase the book and have any feedback it would be greatly welcomed.
A few months ago I did a Terraform course for ine.com. The course guides you from knowing nothing about Terraform to how to use Terraform to manage your AWS infrastructure. The course focuses entirely on using Terraform with AWS to give it some focus but you can apply the same techniques to use Terraform with any provider.
If you are interested in learning Terraform then please check out my course. If you have bought the course and have any questions then please feel free to contact me.
I wrote an open source terraform provider for kong towards the end of last year. The provider gave me a chance to write some go code and also the chance to do an open source project. It seems to be pretty popular which is cool as it is nice to have written something that people are finding useful.
Recently someone logged a really detailed (thanks) github issue against a bug they found with the terraform provider. It turned out the cause of this bug was the way that Kong was returning JSON objects when one of the fields was an empty list. If a list property on the kong API object is set to [] then instead of returning [] Kong returns {}.
I wanted to fix this in a generic way for all list fields on the API object and also fix it for every operation on API (GET, POST, PUT etc). Ie the ideal fix would see the code only being needed in a single place. So to fix this I first wrote a test (test first of course). As an aside the nice thing about the gokong project (and the kong terraform provider) are tested using docker containers so they are actually against the real Kong (no mocks anywhere to be seen!!!).
I quickly realised that I could write my own deserialise JSON method by simply implementing the UnmarshalJSON interface. So my first stab at this was:
This file contains hidden or bidirectional Unicode text that may be interpreted or compiled differently than what appears below. To review, open the file in an editor that reveals hidden Unicode characters. Learn more about bidirectional Unicode characters
The idea behind this code was to simply replace the erroneous {} with [] in the JSON and then call the normal json.Unmarshal func. Unfortunately this code goes into an infinite loop as you keep calling yourself. Which was a shame as this code was nice and concise and would’ve done everything I wanted as it delegated the hard work of actually doing the deserialisation over to the normal json.Unmarshal func.
Then I found out that I can do what I want to do if I use a type alias. Here is the corrected code:
This file contains hidden or bidirectional Unicode text that may be interpreted or compiled differently than what appears below. To review, open the file in an editor that reveals hidden Unicode characters. Learn more about bidirectional Unicode characters
The trick is to use a type alias to alias my Api type over to Alias (note this is a private declaration so is only scoped to the method). Then I use an anonymous struct that uses an embedded type to inherit all of the fields from Api. I then call json.Unmarshal on my anonymous struct with the fixed JSON. Because my type Alias has a single embedded type which is Api it will serialise all of the Api fields to JSON using the fixed JSON.
I think this is a pretty neat solution as it means that anywhere in my whole library that deserialises the Api type will automatically use this code just by virtue of the fact that it implements the UnmarshalJSON interface.
This is a handy thing to know for your toolbox when you need to get involved in the JSON deserialisation pipeline in go. Happy coding!
A couple of posts ago I talked about how you could achieve full stack testing in Go using Docker containers. I have just finished the first version of terraform provider kong, a terraform provider for Kong that is built on top of gokong.
At the moment at Form3 we configure Kong using a custom Ruby script that runs on our Kong container and configures Kong upon boot up. Whilst this works there are a number of problems with this approach:
It is hard to know what the end state of Kong is as you end up with a whole bunch of Ruby code that is hard to follow
If you want to migrate the container over time it can be quite tricky as its hard to clean up APIs, consumers and other Kong resources as you delete them (the database Kong uses is long lasting)
By writing a custom terraform provider for Kong all of these problems go away. As terraform uses a declarative language you simply declare the state that you want the thing you are configuring to be in (in this case Kong) and terraform looks at the current state and automatically works out how to get there. This makes everything so much simpler. A good example is if you remove an API in our current world you have to remember to write a line of Ruby to delete the old API. When using terraform you simply remove the API from your configuration and terraform deletes it for you.
Building upon the way that I wrote gokong I wrote terraform provider kong in the same vein, ie full stack testing using real components and no mocks! This means that the acceptance tests in terraform provider kong spin up a real Kong container and apply terraform plans to it, check it is in the expected state and then destroy it again. Testing in this way gives you ultimate confidence that the code works!
To automate releases of new versions of terraform provider kong I have used the excellent goreleaser. Goreleaser automates building your code for multiple platforms, zipping/tar balling it up and uploading it to github. It is so easy to use, kudos to the authors. To setup you simply need to create a goreleaser.yml file:
This file contains hidden or bidirectional Unicode text that may be interpreted or compiled differently than what appears below. To review, open the file in an editor that reveals hidden Unicode characters. Learn more about bidirectional Unicode characters
My file specifies the binary and builds for mac (Darwin), Linux and Windows. The last part is to define a task to run goreleaser as part of your build. Goreleaser will only run when the build is running as a tag build, therefore you can create a task and run it on every build and goreleaser will only build a release for a tagged build, pretty smart. My build task to create a release looks like:
This file contains hidden or bidirectional Unicode text that may be interpreted or compiled differently than what appears below. To review, open the file in an editor that reveals hidden Unicode characters. Learn more about bidirectional Unicode characters
I run the release task as part of every travis build. You also need to create a github token which is used by goreleaser to upload the release to your github account. To generate a github token go to https://github.com/settings/tokens/new. Then simply set it as a secure environment variable in your .travis.yml and goreleaser will pick it up for you.
Then when you want to create a release you can simply do:
This file contains hidden or bidirectional Unicode text that may be interpreted or compiled differently than what appears below. To review, open the file in an editor that reveals hidden Unicode characters. Learn more about bidirectional Unicode characters
Which will build a new v0.1.0 release and automatically create the binaries and upload the release to Github. Pretty smart!
The last thing I wanted to go through was that I’m taking advantage of the build matrix feature of travis to run the tests against multiple versions of kong. The following section of my travis.yml file:
This file contains hidden or bidirectional Unicode text that may be interpreted or compiled differently than what appears below. To review, open the file in an editor that reveals hidden Unicode characters. Learn more about bidirectional Unicode characters
Travis will automatically run a build for each line under the matrix definition. Each with the values on the line. I pass the KONG_VERSION parameter all of the way through to the code that pulls the Kong container for Docker so it will pull the version that is specified here. Hence I can easily update this build to run against many versions of Kong. As new versions are released I can simply add a line to the build matrix and it will automatically be tested on travis. This is a really powerful feature, being able to run your tests against multiple versions of a target piece of software is immense!
If you are interested terraform provider kong or gokong I would love to hear your feedback and get your ideas and contributions.