In part 1 we setup 6 Ubuntu Server VMs (using VMware ESXI) all available on the host network. In this part we are going to take those 6 VMs and install Kubernetes with Cilium CNI. Our Kubernetes setup will have 3 master nodes (control plane) and 3 worker nodes, making it a highly available cluster. The astute reader will point out that all of the VMs are running on a single host so making this cluster HA is kind of pointless. Yes to a point I would agree with you, but making the cluster HA is better for two reasons, firstly, it will enable zero downtime upgrades to the control plane and secondly it gives us experience in making a HA cluster which for a production use cases we would want to do.
To setup Kubernetes I have decided to go with kubeadm. I know this is cheating a tiny bit versus installing all of the components ourselves, but even though kubeadm does a bit of heavy lifting for us, we will still need to understand a bit about what is going on to get the cluster working.
The instructions I’m going to be following can be found on the kubeadm site. I’m going to talk through the salient points here as I had to add a few workarounds to get the cluster running. First step is to install kubeadm on every node (it would’ve been better to have included this in our first VM that we cloned as it would’ve saved some time but you live and learn). To install kubeadm:
sudo apt-get update
sudo apt-get install -y apt-transport-https ca-certificates curl
sudo curl -fsSLo /usr/share/keyrings/kubernetes-archive-keyring.gpg https://packages.cloud.google.com/apt/doc/apt-key.gpg
echo "deb [signed-by=/usr/share/keyrings/kubernetes-archive-keyring.gpg] https://apt.kubernetes.io/ kubernetes-xenial main" | sudo tee /etc/apt/sources.list.d/kubernetes.list
sudo apt-get update
sudo apt-get install -y kubelet kubeadm kubectl
sudo apt-mark hold kubelet kubeadm kubectl
Once kubeadm is install we can run the following command on master01 to initailise the master node: `
kubeadm init --control-plane-endpoint=skycluster --pod-network-cidr=10.10.0.0/16 --skip-phases=addon/kube-proxy
The above command sets the control-plane endpoint as is recommended by kubeadm if you want to setup a HA cluster. For now skycluster is just a hosts entry that points to master01‘s IP. I have added this entry to every machine in our setup. We are setting the skip-phase kube-proxy flag because I am planning on using Cilium as a CNI. Cilium uses eBPF to super power your cluster and provides the kube-proxy functionality by using eBPF instead of iptables. I recently interviewed Dan Wendlandt the CEO of Isovalent who are the company behind Cilium in the Form3 .tech podcast, an episode well worth listening to!
I got a warning saying that swap in enabled and kubeadm should be run with swap off. To turn off swap run sudo swapoff -a. To make sure that swap stays off even after a reboot we need to edit /etc/fstab and comment out the following line /swap.img none swap sw 0 0 by adding a # to the start of it. After turning off swap, I ran the the kubeadm init command again.
This time command timed out. From the error message it states that the kubelet cannot be contacted. The kubelet is a service that runs on each node in our cluster. Running the command systemctl status kubelet reveals that the kubelet service is not running. For more information as to why the service isn’t running I ran journalctl -u kubelet, then press Shift+g to get to the bottom of the logs, then right arrow to see the full error message which was Failed to run kubelet" err="failed to run Kubelet: misconfiguration: kubelet cgroup driver: \"systemd\ is different from docker cgroup driver: \"cgroupfs\"". To fix this we have to switch either kubelet or docker to use the same cgroup driver. From doing some reading it is recommended to use systemd as the cgroup driver so I updated docker to use systemd by running:
sudo -i
echo '{"exec-opts": ["native.cgroupdriver=systemd"]}' >> /etc/docker/daemon.json
systemctl restart docker
With that change in place lets runkube init...again. This time we get:Your Kubernetes control-plane has initialized successfully!
Wahoo!
To be able to contact the cluster from our machine we need to add the cluster config to our local kube config file. To do this we can copy the file /etc/kubernetes/admin.conf from the master01 node onto our machine. From there we can grab the entry for the new cluster and put it into our kube config file located in $HOME/.kube/config. Once we have done that if we get nodes by running kubectl get nodes we see
NAME STATUS ROLES AGE VERSION
master01 NotReady control-plane,master 13m v1.22.0
The node is not ready! To find out why we can describe the node using kubectl describe node and then if we look in events, we see the error container runtime network not ready: NetworkReady=false reason:NetworkPluginNotReady message:docker: network plugin is not ready: cni config uninitialized. When you install a new kubernetes cluster it does not come with a CNI. The container CNI is responsible for handling the IP addresses for pods that get created (amongst other things). As stated earlier we are going to use Cilium as our CNI of choice so we can super power our cluster.
To install cilium we can use the following command
helm install cilium cilium/cilium --version 1.9.9 \
    --namespace kube-system \
    --set kubeProxyReplacement=strict \
    --set k8sServiceHost=192.168.1.200 \
    --set k8sServicePort=6443
Which I got from the cilium documentation on how to install cilium without kube proxy. I got the port of kube api server by describing the kube-api server pod using describe pod kube-apiserver-master01.
Now that cilium is installed when we check the status of the nodes again we now see:
NAME STATUS ROLES AGE VERSION
master01 Ready control-plane,master 15m v1.22.0
Awesome! The first control plane node is now fully working!
Lets not rest on our laurels, the next job is to setup the two other control plane nodes nodes. This would’ve been made easier if i would’ve had the forsight to pass --upload-certs flag to the initial kubeadm init command. This flag stores the control plane certificates inside a kubernetes secret, meaning the joining control plane nodes can simply download them. Unfortunately, I did not do that so I had to copy the certificates manually. Luckily this helper script is available on the kubeadm documentation:
USER=kevin # customizable
CONTROL_PLANE_IPS="master02 master03"
for host in ${CONTROL_PLANE_IPS}; do
  scp /etc/kubernetes/pki/ca.crt "${USER}"@$host:
  scp /etc/kubernetes/pki/ca.key "${USER}"@$host:
  scp /etc/kubernetes/pki/sa.key "${USER}"@$host:
  scp /etc/kubernetes/pki/sa.pub "${USER}"@$host:
  scp /etc/kubernetes/pki/front-proxy-ca.crt "${USER}"@$host:
  scp /etc/kubernetes/pki/front-proxy-ca.key "${USER}"@$host:
  scp /etc/kubernetes/pki/etcd/ca.crt "${USER}"@$host:etcd-ca.crt
  # Quote this line if you are using external etcd
  scp /etc/kubernetes/pki/etcd/ca.key "${USER}"@$host:etcd-ca.key
done
This script copies all of the certificates we need onto each of our control plane nodes (master02 and master03). Once run, we have to go on to each node and copy all of the certs to /etc/kubernetes/pki (this folder won’t exist so we need to create it). Then we need to copy the etcd-ca.key and etcd-ca.crt to /etc/kubernetes/pki/etcd/ca.key and /etc/kubernetes/pki/etcd/ca.crt respectively. Once those changes are in place I had to change docker to use systemd and turn off swap on each node by (the steps we saw earlier):
sudo -i
swapoff -a
systemctl restart docker
systemctl daemon-reload
With those changes in place we can now run the kubeadm join command that we got given when we successfully ran kubeadm init:
sudo kubeadm join skycluster:6443 --token xxx --discovery-token-ca-cert-hash xxx --control-plane
After running this on both nodes we see a message saying that the node joined successfully. Now when we check the status of the nodes we see:
master01 Ready control-plane,master 24h v1.22.0
master02 Ready control-plane,master 7m48s v1.22.0
master03 Ready control-plane,master 23m v1.22.0```
All of our control plane nodes are now ready to go. To join the worker nodes we just have to run the following set of commands:
sudo -i
swapoff -a
echo '{"exec-opts": ["native.cgroupdriver=systemd"]}' >> /etc/docker/daemon.json
systemctl restart docker
systemctl daemon-reload
kubeadm join skycluster:6443 --token xxx --discovery-token-ca-cert-hash xxx
These commands automate the switching of docker on each of the worker nodes to use systemd, then we use kubeadm to join the node to the cluster. With this command run on each worker node we now have a fully working cluster, which we can verify with kubectl get nodes:
NAME STATUS ROLES AGE VERSION
master01 Ready control-plane,master 24h v1.22.0
master02 Ready control-plane,master 16m v1.22.0
master03 Ready control-plane,master 32m v1.22.0
worker01 Ready 4m12s v1.22.0
worker02 Ready 2m8s v1.22.0
worker03 Ready 101s v1.22.0
Lets check the health of cilium using the awesome cilium cli. To install, simply download the release for your OS and copy the binary to your path. With that in place we can run cilium status which gives us the following output:
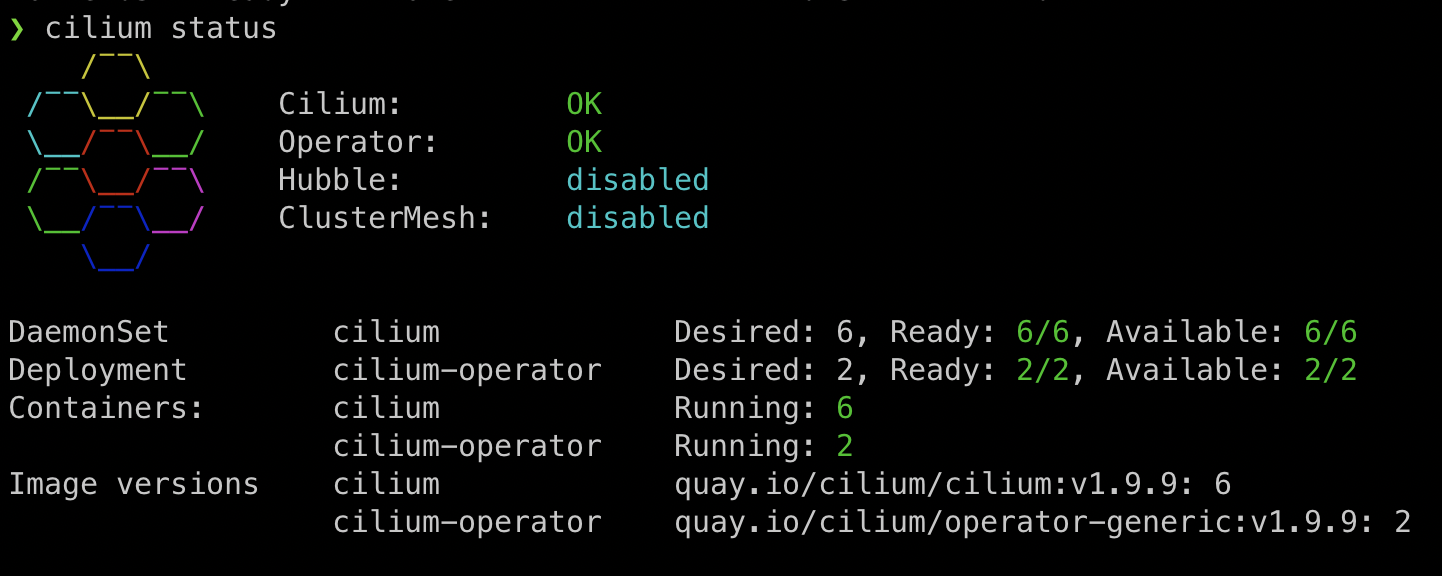
We can see that cilium is healthy and we have 6/6 cilium containers running (one on each node). We now have a fully working Kubernetes cluster ready for action.
