Accessing localhost from the internet

On the latest edition of the excellent Javascript Jabber podcast one of their guests has suggested an excellent tool in their picks section. The tool is called ngrok. Ngrok makes your localhost available on the internet! Very handy if you want to test you local site on a mobile, tablet or share with someone outside of your network.

If you are interested you can download the tool from:

https://ngrok.com/download

There is a version available for Mac, Windows, Linux and ARM. The program is really simple to use. On the Mac you simply unzip and run by running ./ngrok from the terminal. This then gives the following output:


ngrok                                                                          (Ctrl+C to quit)

Tunnel Status                 online
Version                       1.7/1.6
Forwarding                    http://<address>.ngrok.com -> 127.0.0.1:80
Forwarding                    https://<address>.ngrok.com -> 127.0.0.1:80
Web Interface                 127.0.0.1:4040
# Conn                        0
Avg Conn Time                 0.00ms

Then you simply go to the address listed and you will be forwarded on to your machine on port 80. Note I have removed the address above.

From reading the documentation ngrok gets much cooler. It will give you a full detailed log of everything it’s captured on http://localhost:4040, allow you to replay requests, capture requests, forward requests on to another machine on the network and much more.

You can check out the source on github. Looks like the main contributer was Alan Shreve, great work Alan. Check out his website. I love the fact the community produce cool tools like this!

Handy powershell script for deploying nuget packages

I was recently presented with the problem to automate the deployment of a nuget package to a server. Now before you guys say I know that Octopus Deploy is the best way to go and I completely agree. At the moment at the organisation I’m at using a product like Octopus has to go through an “approval” process. Faced between the choice of having to carrying on deploying using file explorer (which is what the guys currently did here) and automating it, I voted for the latter option.

Now Team City is not really geared towards doing deployments. After all it’s designed to be a build server and that’s what it does extremely well. However we can make it work.

The first thing you need to do is package up your built web site into a nuget package and deploy it to a nuget server (either a local one or the public one). For those that dont know a nuget package is literally a zip file, you can even rename it .zip and it will extract. The reason for using a nuget package is that it gives you a nice way to place it onto a server, version it and in the future plug in Octopus Deploy.

So onto the script:


param([string]$computerName, [string]$destinationDir, [string]$packName, [string]$packVersion, [string]$executeLocally)

Write-Host "computer name: $computerName"
Write-Host "destination dir: $destinationDir"
Write-Host "package name: $packName"
Write-Host "package version: $packVersion"
Write-Host "execute locally: $executeLocally"

$deployScript = {
param($dest, $packageName, $version)

$basePath = "d:\packages\"

$packageNameAndVersion = "$packageName.$version"
$extractDir = $basePath + $packageNameAndVersion

Write-Host "deploying to: $dest"
Write-Host "extracting to: $extractDir"
Write-Host "package: $packageName"
Write-Host "version: $version"

$zipDownload = $packageNameAndVersion + ".zip"

$packageUrl = "http://nuget.org/api/v2/package/$packageName/$version"

if (-Not (Test-Path $extractDir))
{
New-Item -ItemType directory -Path $extractDir
}else{
Get-ChildItem -Path ($extractDir + "\*") -Recurse | Remove-Item -Recurse -Force -Confirm:$false
}

$Path = $basePath + $zipDownload

Write-Host "Downloading package..."
$WebClient = New-Object System.Net.WebClient
$WebClient.DownloadFile($packageUrl, $path )

Write-Host "Extracting package..."

$shell = new-object -com shell.application
$zip = $shell.NameSpace($path)

foreach($item in $zip.items())
{
$shell.Namespace($extractDir).Copyhere($item)
}

Write-Host "Cleaning destination..."

Get-ChildItem -Path $dest -Recurse | Remove-Item -Recurse -Force -Confirm:$false

Write-Host "Deploying..."

Copy-Item ($extractDir + "\*") $dest -Recurse

Write-Host "Removing downloaded package from $path"
Remove-Item $path -Recurse -Force -Confirm:$false

Write-Host "Removing extracted package from $extractDir"
Remove-Item $extractDir -Recurse -Force -Confirm:$false
Remove-Item ("$extractDir\") -Recurse -Force -Confirm:$false

Write-Host "Done."

}

$output = Invoke-Command -ScriptBlock $deployScript -ArgumentList $destinationDir, $packName, $packVersion

Now when you configure your team city build you need to pass in the following 3 parameters: $destinationDir, $packName and $packVersion. The destination dir is the directory you wish to deploy to e.g. \\192.168.1.1\WebSites\MyWebSite. The package name is the package id of the nuget package and the packVersion is the version number of the nuget package. That’s it! Simply huh?

You will need to make sure that the Team City user account has write access to the folder you are deploying to.

deploy

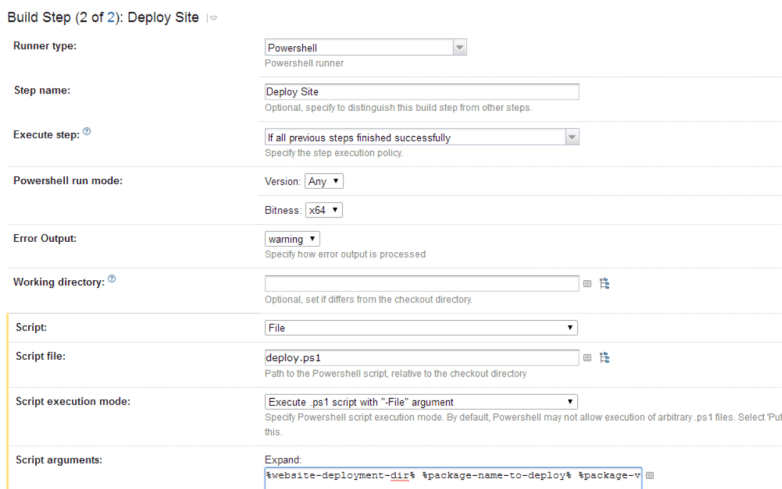
In the screenshot above you can see how to setup the powershell script to run. You can either check it into your source control system and then enter the path to the file in the script file dialog above or alternatively you can copy and paste the source directly into Team City. I would recommend having the powershell script in source control as then if you have multiple deploy builds changing the script will mean every build will get the new powershell script.

In the script arguments dialog you need to pass in the parameters to the script described above.  You can either hard code these (not recommended) or you can use Team City parameters and then present the user with a dialog when they go to run the build.  To do this I use the following parameters:

%website-deployment-dir% %package-name-to-deploy% %package-version-to-deploy%

After you have saved this, Team City will prompt you to setup these parameters. Go to the parameters section of your build configuration. Click on one of the parameters. Click spec, then in the dialog that appears next to display select “prompt”. You can enter a default value if you wish or even give the user a dropdown select with for example every website they can deploy. By using the prompt option when the user clicks to run the build they will be presented with a dialog that will force them to enter these parameters.

So there you have it, a quick and simple build that can deploy any nuget package to any server. Simples.

As always if anyone has any questions or wants to go through anything feel free to contact me. Happy deployments!

Don’t just throw it over the wall

Something that really gets to me as a developer is when I hear developers say “throw it over the wall to the testers”. A good software team should be just that… a team. You are one team all helping to achieve the goal ie deliver the software.

Most companies now use Agile Scrum methodology and have cross functional teams that consist of a number of developers, testers, BAs and a scrum master. It annoys me when developers and testers sometimes consider each other enemies. Some developers treat testers like an annoying teacher marking their homework. Testers can be just as bad.

We all need to remember that we are part of one team. If you think of it like an F1 team where would the driver be without the mechanics to change the tyres, build the car and test it? No one skill can complete the task on their own so let’s all work together to get the job done.

Importance of TDD

Last post I wrote about a series renamer that I wrote in node using TDD. The other day I went to use the renamer on a bunch of files and found that it threw the following error:

TypeError: Cannot read property '1' of null
      at Object.getShowDetails (nameParser.js:25:47)

From looking at the show titles I was renaming I realised there was a filename that I had not taken into account namely one like this:

cool_show_107.mp4

This title means that it is episode 7 of series 1. Previously the only formats accounted for were when the season and episode were prefixed with an ‘s’ and ‘e’ respectively. Which brings me round to today’s topic. How important it is to build your software using a TDD approach and the advantages it gives you.

Upon seeing this error I could tell straight away from the stack trace that the error was in nameParser.js. So the first thing I did was write a test to reproduce this error.


describe('and the series and episode number are in 3 digit format', function(){
    it('should return the information for the series and episode correctly', function(){
        var result = nameParser.getShowDetails('cool_show_102');
        result.seriesNumber.must.be(1);
        result.episodeNumber.must.be(2);
    });
});

When I run the tests after adding this unit test I get the same error so I know I have reproduced the defect. Now I have a failing test that once I get passing will mean the defect will never come back. Also note how easy this was for me to track down the defect because the code is decoupled and already heavily tested.

Once the test is written all that is left is to get it to pass by adding another regex to the nameParser to detect 3 consecutive numbers. Once this was passing I ran the renamer again on the list of files and found a different error. Some of the files were in this format:

cool_show_S01E07_encoding_x264.mp4

This caused an issue because 3 consecutive numbers were being picked up by the nameParser and because that regex was running before the one looking for seasons and episodes prefixed with ‘S’ and ‘E’ it was incorrectly giving season 2 and episode 64 for the above filename.

So to fix again using TDD this is very simple. Add another test reproducing the defect:


describe('and the series and episode number are specified and a 3 digit number appears after them', function(){
    it('should return the information for the series and episode correctly', function(){
        var result = nameParser.getShowDetails('cool_show_S01E02_cool_x264');
        result.seriesNumber.must.be(1);
        result.episodeNumber.must.be(2);
    });
});

To fix all I had to do was simply rearrange the order the regex statements run in the nameParser. 39 tests now passing. I then ran the series renamer on the files in question and it worked perfectly.

The lesson here is that by building software using a TDD approach it forces you to write decoupled components each with their own job. Which means that it’s easy to isolate defects when they occur and write tests that reproduce the defects. Once the test is passing that defect cannot reoccur without failing a test.

If you want to checkout the full code for the series renamer you can clone it on github.

TV Series Renamer Written in Node

I found myself in the situation the other day where I had a season of a TV show that needed renaming sequentially to clean up the file names.  The files were located in sub folders making it quite a laborious manual task to clean this up.  Step forward a node coding challenge.

I wrote the renamer using a fully TDD practice in node.  The finished program is blazingly fast.  The whole set of unit tests (37 at time of writing) including a test which creates dummy files, moves them, checks them and then cleans everything up (integration test) takes 51ms!

I used mocha for my unit tests.  Mocha using the same syntax as Jasmine (describe and it) giving a nice clean syntax.  There are a few extra features you get with mocha out of the box that you don’t get with Jasmine making it my preferred unit testing framework.  Before anyone shouts I know you can extend Jasmine to do the same thing but it’s nice just having all of these features there from the get go.

The first nice feature of mocha is being able to run a single unit test.  To do this simply change describe(‘when this happens…  to describe.only(‘when this happens…  By adding the ‘.only’ you are telling mocha to only run this describe block and any child tests of this block.  This can come in handy when you are working on getting one test passing on a big project and you dont want the overhead of running every test.  You can also use ‘.only’ on it statements which will only run a single test.

The next cool feature of mocha is the way that it handles testing asynchronous code.  Mocha gives you a done callback you can pass into a beforeEach or it statement.  You call done when you are done.  Mocha will automatically wait for done to be called before failing the test or time out if you never call done.

beforeEach(function(done) {
    seriesPath = __dirname + '/testSeries1/';
    fileFetcher.fetchFiles(seriesPath).then(function(data){
        result = data;
        done();
    });
});

The above code shows an example beforeEach block from the fileFetcher tests. The code fetches the files and in the ‘then’ handler it saves the result and then calls done. This is a very neat way of handling asynchronous testing.

Another awesome library that deserves a mention is Q. This library is renowned for being the best implementation of a promise library and makes dealing with asynchronous code much easier. Q allows you to store a promise when you call an asynchronous function rather like Task in .net. The promise allows the program to continue and then handle that result or error when it comes in.

There are two common ways that promises are handled. Either straight away by using a ‘then’ block or by storing the promise and then examining it later.

fileRenamer.generateRename('Great_Show', seriesPath, outputDir)
    .then(function(data){
        results = data;            
    });

var x = 11;

Above is an example of using a then handler. The function will be called by Q when the generateRename function returns something. The value that is returned by generateRename will be passed in to the data parameter in the anonymous function below. Note the line ‘x=11’ may execute before the line ‘results=data’. It is saying execute this then execute this.

The other way promises are normally used is by storing them and waiting on them later. This is especially useful if you have several tasks that can all run in parallel. You can set them all going storing the promise they give you back. When they all finish you can collect the results and continue on.

var promises = [];
promises.push(processDir(dir));

for(var i=0; i<files.length; i++){
    if (fs.lstatSync(dir + files[i]).isDirectory()){
        promises.push(processDir(dir + files[i]));
    }
}		

$q.all(promises).then(function(promiseResults){								
    deferred.resolve({episodes: _.flatten(promiseResults)});
});

The above code is a snippet from the fileFetcher.js file. processDir is being called upon each iteration of the for loop setting in motion a task to move a file. The promise returned by processDir is stored in an array of promises. Q gives us a method call ‘all’ which takes an array of promises and then you can use the same ‘then’ statement as shown above. This time the parameter passed into the handler will be an array with the results of all of the promises. The beauty is this array will be in the same order that you kicked them off in. Allowing you to marry up your results pretty cool!

So you might be wondering how to I return a promise from a function. Good question. You simply use the following pattern:

function Square(x)
{
    var deferred = $q.defer();
    deferred.resolve(x*x);
    return deferred.promise;
}

The function above will return a promise that will give you the result of squaring the parameter passed in. You would use it like this:

Square(3).then(function(result){
    console.log(result);
});

The last part of Q I want to talk about that is awesome is it’s ability to wrap up node functions and make them return promises. For example the rename file is fs.rename(oldPath, newPath, callback). Normally you would pass in a callback to call when the file is renamed. But then if you wanted to call another asynchronous function after and pass in another callback quickly your code would become a nested mess that would be hard to follow. Step up denodeify. Denodeify tasks a node function that calls a callback and makes it return a promise instead:

// instead of having a callback like this
fs.rename('test.txt', 'test2.txt', function(){
    console.log('done');
});

// you can wrap the function with q like this
var moveFile = $q.denodeify(fs.rename);

// then call it as you would any function that returns a promise
moveFile('test.txt', 'test2.txt').
    then(function(){ console.log('done'); });

This comes in especially handy when you are doing many operations in a loop. Like is being done in my fileRenamer.js file. I will leave the reader to examine the code below which combines all of the ideas explained thus far.


var performRename = function(showName, fromDir, toDir) {
    var deferred = $q.defer();

    generateRename(showName, fromDir, toDir)
        .then(function(files){				
            var promises = [];
            var moveFile = $q.denodeify(fs.rename);
            
			for(var i=0; i<files.length; i++){
                promises.push(moveFile(files[i].from, files[i].to));
            }
            $q.all(promises).then(function(){
                deferred.resolve(files);
            });
				
        });

    return deferred.promise;
};

If you want to read up more on q please see the documentation.

Please feel free to download the full source code of the series renamer from github. If you have any questions or comments feel free to give me a shout I will be happy to help.

Coalescing operator rules in JavaScript

Coalescing rules in JavaScript can be confusing especially when you first learn the language. The first case we are going to look at is the plus operator.

  1. number + number = number
  2. number + string = string
  3. string + string = string
  4. bool + number = number
  5. bool + bool = number
  6. bool + string = string

Rule 1 is not surprising 1+2 = 3.  That’s what we all expect.  Its the other rules that may surprise people.  Rule 2 means that 3 + ‘hello’ = ‘3hello’.  The reason for this is that because the right hand operand is a string the number 3 gets coalesced into a string ‘3’ and then the plus operator acts as a concatenation.  Rule 2 also means that ‘1’ + 2 = ’12’ for the same reason the fact that ‘1’ could be converted to a number does not come into play.  Rule 3 will be obvious to people who have used other programming languages ‘hello’ + ‘ world’ = ‘hello world’.  Because both operands are strings + simply acts as a concat operator.  Rule 4 will probably catch a lot of people out.  When one operand is a bool and the other is a number the bool is converted to a number with false being 0 and true being 1.  So false + 2 = 2 and true + 2 = 3.  Rule 5 is a logical extension of rule 4.  When both operands are bool then they are both treated as numbers using the same values as before so true + false = 1.  Rule 6 is slightly odd as now bools behave totally differently.  When a bool is operated on with a string the bool is converted to a string instead of a number as in rules 5 and 6.  So true + ‘world’ = ‘trueworld’.  Think of it like calling ToString() in .net on the boolean.

Now that we have established some of the rules of how types behave when they are combined with other types we can see why it is important to know the difference between == and === in JavaScript. Let’s start with ===. === says look at both operands if the types are different then the expression is false, if the types are the same then compare them.  This is logically what most people would expect so:

  • 2 === ‘hello’ = false
  • 3 === true = false
  • 3 === false = false
  • ‘hello’ === ‘world’ = false
  • ‘3’ === 3 = false
  • 1 === true = false

Notice the last 2 of the six cases above.  We are comparing the string 3 to the number 3.  This is false because one side is a string and the other is a number so the expression is false regardless of the values.  1 === true = false because again both types are different.

This is where the important difference comes in with the == operator.  The == operator says first change both coalesce both of the types then compare.  Here are the expressions again using == operator:

  • 2 == ‘hello’ = false
  • 3 == true = false
  • 3 == false = false
  • ‘hello’ == ‘world’ = false
  • ‘3’ == 3 = true
  • 1 == true = true

Notice how now the last 2 expressions are true.  This is because the number 3 is turned into the string 3 because the types are different and then the string ‘3’ is compared to the string ‘3’ which is the same.  The last expression may be surprising that its true but its true for the same reason.  The bool true is first converted to the number 1 and then the number 1 is compared to the number 1 which is true.

Before I close this blog post I would like to address one more rule which surprises people.  When using the minus operator the rules change slightly from the plus operator above.  The rules change when you have a string and a number.  Whereas for plus that results in a concatenation, when you minus a string from a number or vice versa the string is first converted to a number and then the minus operation takes place.  Therefore ‘7’ – 5 = 2 because the ‘7’ is converted to a number.  ‘hello’ – 1 = NaN (not a number) because you can’t convert the string ‘hello’ to a number.


JavaScript Falsy Values

Having read Douglas Crockford’s fabulous Javascript the good parts book I wanted to point out one of the biggest gotchas in JavaScript… Which values are false?

There are 6 values that evaluate to false in JavaScript, EVERYTHING else will evaluate to true.  The 6 falsy values in JavaScript are:

  • 0  – the number 0
  • NaN – not a number)
  • ” – the empty string
  • false – the boolean value false
  • null
  • undefined

This can lead to some surprising values being true for example:


if ('0') { // this is true
if ('false') { // this is true
if (' '){ // this is true

The top value is true because we are testing the string 0 not the number 0. The second one is true because we are testing the string ‘false’ and not the Boolean false. The last one is true because the string is not empty – it has a single space character.

So remember if you are not dealing with one of the 6 values above then the answer is true… simples!

AngularJS vs Facebook React Cage Match

Currently I am working on an enterprise application with an AngularJS frontend and Web API backend.  In parts of the application the page load time in unbearable.  This is especially noticeable on pages with Angular repeater directives with around 100 items or more (even in Chrome).  This lead me to look at how we could speed up these slow pages and I stumbled across Facebook React.

The following demo is well worth checking out if you haven’t heard of Facebook React:

Facebook React is built for speed. The rendering model takes a very different approach to other two way binding libraries such as AngularJS or Knockout. Traditionally two way binding libraries rebuilt every changed element in the DOM every time any element changes.  This can obviously lead to redundant work. Facebook react works in a different way.  It builds a virtual DOM in the background and computes the minimum set of operations needed to transform the virtual DOM based on the changes made. This means that there are no wasted operations. This is a bit like the concept that is used in a 3D games where objects that are completely hidden from vision are not drawn and then drawn over they are simply not drawn at all.

To test which is faster I have built a simple angular app that tests an Angular repeater against a react component. The app simply creates an array of x size and then binds that array to the Angular repeater or React component (depending which button you click) and times it.

To implement the app I started with the angular-seed project as it gives you an out of the box AngularJS app (complete with node web server).  For angular I am using a straight forward repeater bound to the array.  To time how long the binding takes in angular I am using a directive:

.directive('postRepeatDirective', ['$timeout',  function($timeout) {
	return {
		link: function(scope, element) {
			if (scope.$last){
				$timeout(function(){
					var end = new Date();
					$('#results').text("## Angular rendering list took: " + (end - scope.startTime) + " ms");
				});
			}
		}
	}
	}

This function checks for when the $last element is bound by the ngRepeat directive. When it is it assumes that all of the elements have been bound so it stops the timer. The start time is set when you click the button.

For Facebook React things are very similar. Except we are using a directive to do all of the work:

directive('reactRepeater', [function() {
    return {
      restrict: 'E',
      link: function(scope, element) {
        scope.$watch('reactArray', function(newVal, oldVal) {

          React.renderComponent(ReactResults({
            array: scope.reactArray
          }), document.getElementById('reactResults'), function(){

          	var end = new Date();
          	if (scope.reactArray.length > 0){
        		$('#results').text("## React rendering list took: " + (end - scope.startTime) + " ms");
        	}
          });
        }, true);

      }
    }
}])

We are using this directive to delegate the rendering to react. React has a method called renderComponent. It’s first argument is the component you want to render. We are rendering our ReactResults component and passing it the array. The second argument is the element where you want that component to render. The third argument is a callback that fires when React has finished rendering the component so this is where we can put our timing logic.

The React component looks like:

var ReactResults = React.createClass({
  render: function() {

   var results = [];
   for(var i=0; i<this.props.array.length; i++){
   	results.push(React.DOM.p({}, 'Hello'))
   }

    return React.DOM.div({}, results);
  }
});

The astute reader will have noticed that we are still using AngularJS to watch the array. Indeed we are and this will alter the results. The reason for this is that I wanted to test React in the context of using it just for the rendering inside an AngularJS app. React only provides rendering capabilities. As is stated on React’s site they are the V in View in the usual MV* para-dime. You still need a framework to combine with React to get all of the other goodness you normally want when building a rich web application.

Onto the results. The following data shows how long it took Angular and React to render ever increasing numbers of array elements.  The times are in milliseconds.

Elements Angular React
10 5.33 2.00
100 35.00 9.33
1,000 201.33 57.67
10,000 2,064.67 383.00


chart


As I tried to increase the number of elements further Angular started to crash my browser :(.  As you can see from the graph above Angular is on an exponential curve as the number of elements increase.

The data confirms what is promised by the React guys. That React is a lightning fast rendering framework. Remember it has been hampered in these tests as it was bootstrapped by Angular!  The test proves that due to the modular nature of Angular it is easy to swap out the rendering part with another rendering engine such as React. This means that if you have an existing Angular application and you want a performance increase then using React components inside directives is a good solution.

To reiterate again Angular does give you a nice structure to your code. So using it along with something like React gives you both an awesome framework for structuring large applications and a fast(er) rendering than you would out of the box with Angular.

The code used for these tests is all up in github so you can run them for yourselves.  You will need node and git installed . If you want to run the application yourself follow these instructions:

git clone git@github.com:kevholditch/AngularVsReact.git
cd AngularVsReact
npm install
node ./scripts/web-server.js

Now the app should be running. Access it by hitting http://localhost:3000/app/index.html. Give it a try. As always comments welcome. I would be keen to hear of your experiences with Angular and React.

BuilderFramework – Dependent steps

Last time I started to detail about a new open source builder framework that I was writing. Today I wanted to speak about dependent steps.

It is important for the builder to support dependent steps. For example you might have one step to create an order and another step to create a customer. Obviously the step to create the customer will need to run before the step to create the customer. When reversing these steps they will need to run in the opposite order.

To manage this I have written an attribute DependsOnAttribute. This attribute takes a type as it’s constructor parameter.  The attribute allows you to annotate which steps your step depends on. For example:


public class CreateCustomerStep : IBuildStep { ...

[DependsOn(typeof(CreateCustomerStep))]
public class CreateOrderStep : IBuildStep { ...

To support this the commit method needs to sort the steps into dependency order. It also needs to check for a circular dependency and throw an exception if one is found. We are going to need a separate class for managing the sorting of the steps (remember single responsibility!). The interface is detailed as follows:

public interface IBuildStepDependencySorter
{
    IEnumerable Sort(IEnumerable buildSteps);
}

Before we implement anything we need a set of tests to cover all of the use cases of the dependency sorter.  That way when all of the tests pass we know that our code is good. I always like to work in a TDD style.  (The tests I have come up with can be seen in depth on the github source page or by cloning the source).

At a high level these are the tests we need:

  • A simple case where we have 2 steps where one depends on the other
  • A simple circular reference with 3 steps throws an exception
  • A complex circular reference with 5 steps throws an exception
  • A more complex but valid 4 step dependency hierarchy gets sorted correctly
  • A multiple dependency (one step dependent or more than one other step) gets sorted correctly

It is so important to spend a decent amount of time writing meaningful tests that test all of the use cases of your code.  Once you have done this it makes it so much easier to write the code.  I see so many people writing the code first and then retro fitting the tests.  Some developers also claim that they haven’t got time to write tests.  I can’t see this logic.  When writing tests first your code is quicker to write as you know when the code is working.  If you write your tests last then you are just caught in a horrible debugger cycle trying to work out what’s going wrong and why.  You should rarely if ever need the debugger.

To implement dependency sorting we need to implement a topological sorted as detailed on wikipedia. I have decided to implement the algorithm first described by Khan (1962).

Here is the Psuedo code for the algorithm:

L ← Empty list that will contain the sorted elements
S ← Set of all nodes with no incoming edges
while S is non-empty do
    remove a node n from S
    add n to tail of L
    for each node m with an edge e from n to m do
        remove edge e from the graph
        if m has no other incoming edges then
            insert m into S
if graph has edges then
    return error (graph has at least one cycle)
else
    return L (a topologically sorted order)

Here is that code in C#:

public class BuildStepDependencySorter : IBuildStepDependencySorter
{
    private class Node
    {
        public Node(IBuildStep buildStep)
        {
            BuildStep = buildStep;
            IncomingEdges = new List<Edge>();
            OutgoingEdges = new List<Edge>();
        }

        public IBuildStep BuildStep { get; private set; }
        public List<Edge> IncomingEdges { get; private set; }
        public List<Edge> OutgoingEdges { get; private set; }
    }

    private class Edge
    {
        public Edge(Node sourceNode, Node destinationNode)
        {
            SourceNode = sourceNode;
            DestinationNode = destinationNode;
        }

        public Node SourceNode { get; private set; }
        public Node DestinationNode { get; private set; }

        public void Remove()
        {
            SourceNode.OutgoingEdges.Remove(this);
            DestinationNode.IncomingEdges.Remove(this);
        }
    }

    public IEnumerable<IBuildStep> Sort(IEnumerable<IBuildStep> buildSteps)
    {
        List<Node> nodeGraph = buildSteps.Select(buildStep => new Node(buildStep)).ToList();

        foreach (var node in nodeGraph)
        {
            var depends = (DependsOnAttribute[])Attribute.GetCustomAttributes(node.BuildStep.GetType(), typeof(DependsOnAttribute));
            var dependNodes = nodeGraph.Where(n => depends.Any(d => d.DependedOnStep == n.BuildStep.GetType()));

            var edges = dependNodes.Select(n => new Edge(node, n)).ToArray();
            node.OutgoingEdges.AddRange(edges);

            foreach (var edge in edges)
                edge.DestinationNode.IncomingEdges.Add(edge);
        }

        var result = new Stack<Node>();
        var sourceNodes = new Stack<Node>(nodeGraph.Where(n => !n.IncomingEdges.Any()));
        while (sourceNodes.Count > 0)
        {
            var sourceNode = sourceNodes.Pop();
            result.Push(sourceNode);

            for (int i = sourceNode.OutgoingEdges.Count - 1; i >= 0; i--)
            {
                var edge = sourceNode.OutgoingEdges[i];
                edge.Remove();

                if (!edge.DestinationNode.IncomingEdges.Any())
                    sourceNodes.Push(edge.DestinationNode);
            }
        }

        if (nodeGraph.SelectMany(n => n.IncomingEdges).Any())
            throw new CircularDependencyException();

        return result.Select(n => n.BuildStep);
    }

}

Imagine how hard this code would’ve been to get right with no unit tests! When you have unit tests and nCrunch an indicator simply goes green when it works! If you haven’t seen or heard of nCrunch before definitely check that out. It is a fantastic tool.

Now that we have the dependency sorter in place all we need to do is add some more tests to the builder class.  These tests ensure that the steps are sorted into dependency order before they are committed and they are sorted in reverse dependency order when they are rolled back. With those tests in place it is quite trivial update the builder to sort the steps for commit and rollback (see snippet from builder below):

private void Execute(IEnumerable<IBuildStep> buildSteps, Action<IBuildStep> action)
{
    foreach (var buildStep in buildSteps)
    {
        action(buildStep);
    }
}

public void Commit()
{
    Execute(_buildStepDependencySorter.Sort(BuildSteps),
                buildStep => buildStep.Commit());
}

public void Rollback()
{
    Execute(_buildStepDependencySorter.Sort(BuildSteps).Reverse(),
                buildStep => buildStep.Rollback());
}

I love how clean that code is. When your code is short and to the point like this it is so much easier to read, maintain and test. That is the importance of following SOLID principles.

As always I welcome your feedback so feel free to tweet or email me.

BuilderFramework – a framework for committing and rolling back test setup

In a recent piece of work the need has come up again to write some builder code for use with tests.  I feel passionately that you should take as much care with your test code as you do with your main software code that goes out of the door.  The reason for this is that your tests are your specification.  They prove the software does what it says it is going to do.  Having well written, clean and repeatable tests is vital.  Tests that are hard to maintain and brittle get ignored when they aren’t working.  Unfortunately you hear phrases like “Oh don’t worry about that test it’s always broken” all too often.

Part of the reason that a lot of tests I see out in the real world aren’t repeatable is that they rely on 3rd party systems that they can’t control very easily.  The biggest one of these is a database.  I’ve seen acceptance tests relying on a certain set of products having certain attributes in a database.  It’s not hard to see why this isn’t a great idea.  As products change in the database the tests start breaking.

To fix this problem a nice approach is to use the builder pattern to build setup your data in a certain way, run your test and then roll the data back to how it was before.  This is something that I have written various times so I’ve decided to start an open source project on github.  The product will provide the boiler plate code so you can just concentrate on writing the steps.

The project will have an interface that you have to implement that looks like this:

public interface IBuildStep
{
    void Commit();
    void Rollback();
}

It doesn’t get any more straight forward than that. Once you have written a build step you will be able to add it to the main builder in 2 ways. The first way is you can just pass in an instance:

var builder = new Builder()
                    .With(new MyStep());

The second way is that you can provide a type that can build your step. This allows you to write a builder that can build up a class using a fluent interface and just plug it in. For example if I had a builder:

public class MyStepBuilder
{
    private MyStep _myStep;

    public MyStepBuilder()
    {
        _myStep = new MyStep();
    }
    
    public MyStepBuilder WithValue(int value);
    {
       _myStep.Value = value;
    }
    // more methods here to setp all of the properties on _myStep
    // ...

    public MyStep Build()
    {
       return _myStep;
    }
}

Then you would be able to plug that builder into the main builder giving you a fluent interface:

    var builder = new Builder()
                        .With<MyStepBuilder>(s => s.WithValue(3)
                                                   .Build());

Either way once you have an instance of the builder you can then commit your steps by calling commit and then roll them back by calling rollback.

Keep an eye on the github project to see how this developed. If you like the idea or have any thoughts about how it can be improved please give me a shout.